Anim4Bot

Robotic and DIY

  • Hexapod Robot
    • Animabot Rev3
      • Mecha
      • Hardware
      • Software
    • Animabot Rev2
    • Animabot Rev1
  • 3 axis CNC
  • Raspberry Pi
  • Robotic Team
  • SolidWorks
  • 3D Printer
  • Software
    • Image Processing
  • Contact

Animabot Rev2 – Body Design

Posted by Emmanuel Sichet on 16/04/2014
Posted in: Animabot Rev2. Tagged: design, hexapod, robot, Solidworks. Leave a comment

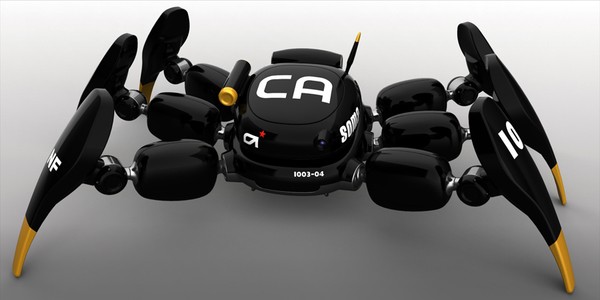
Hi guys, I have been working on the body for 1 week now, the results are encouraging 🙂 I have a definitive shape and volume for the body, and everything should fit inside (normally…)

I also found an effective solution for fixing the servos inside the body, I still have to make some strength analysis in Solidworks to check if everything is Ok.

The body is of course not finished, I have to create all the fixations for the electronic boards, the batteries, the head support, etc…

I have also to be careful with the screws I will use for fixing every parts, because I don’t want to have to cut them because they are too long… I have also to pay attention with the cables : ensure there is enough space for them 😉

The next steps are :

  • Design the femur part
  • Design the part between the femur and the coxa (articulation on the body)

This is my progression so far :

Body uncovered
Body uncovered
Body complete
Body complete
Body complete
Body complete

Animabot Rev2 – 3D Design

Posted by Emmanuel Sichet on 09/04/2014
Posted in: Animabot Rev2, SolidWorks. Tagged: design, hexapod, Solidworks. Leave a comment

I started the design on Solidworks of the legs and the body.You can get the servos parts from Hovis and open them in Solidworks.

I made some very accurate plan of the hexapod that I can follow for the design :

Outside view
Outside view

This is just the beginning, so the exoskeleton is not yet finished, but this is more or less the future look of Animabot. I have of course to integrate all the electronic parts, and as you can see, there so so much space in that 😉

Leg
Leg
Leg
Leg
Body covered
Body covered
Body uncovered
Body uncovered

The hard part is to find a way of fixing the servos on the exoskeleton (I don’t want to use glue or crap fixations) in a way that I can assemble all the hexapod or replace a part in case of damage. I want to be able to assemble/disassemble it with screws (same principle as with a toy or a laptop).

So still a lot of work to do ^^


Animabot Rev2 – Power Supply

Posted by Emmanuel Sichet on 28/03/2014
Posted in: Animabot Rev2. Tagged: Animabot, hexapod, raspberry pi, STM32F4, voltage regulation. Leave a comment

I finally received my samples from Texas Instrument for the voltage regulation. I chose to use several switching regulators in order to clearly separate each feature.

Animabot Rev2
  1. The little one on the top left is a PTN04050C, it will be used as 5v power supply of the RasPi, the STM32 and the class D ampli of the speaker.
  2. The two on the left are PTN78060WAH, I will used only one for the light LED for night vision.
  3. The tree on the right are PTN78020WAH , they will be used the the legs: One for 2 legs (front, middle, rear).

Modules characteristics :

  • 3-A Output Current (PTN04050C and PTN78060W)
  • 6-A Output Current (PTN78020WAH)
  • Wide-Input Voltage (2.95 V to 5.5 V) : PTN04050C
  • Wide-Input Voltage (7 V to 36 V) : PTN78060W and PTN78020WAH
  • Wide-Output Voltage Adjust (5 V to 15 V)  : PTN04050C
  • Wide-Output Voltage Adjust (2.5 V to 12.6 V) : PTN78060W and PTN78020WAH
  • High Efficiency (Up to 96%)
  • On/Off Inhibit
  • Under-Voltage Lockout
  • Output Current Limit
  • Over-temperature Shutdown
  • Operating Temperature: -40°C to 85°C


Animabot will use 2 batteries :

  1. 3.7v, 2500mAh Li-Po with charger for the brain
  2. 7.4v, 3900mAh Ni-MH for the legs

Each battery will have its own charger integrated in the robot, with one input connector for both.

The charger of the 7.4v battery is a LTC40008 , but it is only the chip, so I will have to make the circuit on the mother board. I will see that later…

The two batteries will be monitored by a specific component : LTC2945 (one one each). Animabot will be able to check the voltage and current on each battery and when the batteries will be low, Animabot will put itself on power saving mode, or sleep mode.

For the moment I am using another DC-DC boost converter from dfrobot for testing purpose, but in the future I will replace it by the PTN04050C  on the motherboard.

Brain Power Supply
Brain Power Supply
Brain Power Supply
Brain Power Supply
Li-Po charger
Li-Po charger

Animabot Rev2 – Boards

Posted by Emmanuel Sichet on 28/03/2014
Posted in: Animabot Rev2, Raspberry Pi. Tagged: Animabot, chibios, hexapod, raspberry pi, raspbian, STM32F4. 1 Comment

The Raspberry Pi is flashed with the Raspbian OS (quick start guide available here).

The STM32 is flashed with the RTOS ChibiOS. ChibiOS is compact, fast and open source OS : Perfect for me !

STM32F4 Discovery Board

STM32F4 Discovery Board

I modified the power connector of the Pi in order to connect it with another connector. As you can see on the architecture document, I will use a small 3.7v Li-Po battery for the Pi and the STM32 with a special power supply (PTN04050C). So I soldered a JST connector with cables :

Animabot Rev2
Brain Power Supply
Brain Power Supply

The Raspberry Pi will will equipped with a “smart switch”. As you are running a Linux on it and a SD-Card, you can not unplug the Pi as you wish. If you shut off your Pi while it is writing on the SD-Card, you might corrupt this one… And you will have to flash it again… 😦

So to prevent this a found what I call a “smart switch” from Mausberry Circuits :

Smart switch
Smart switch

With this switch, you only have to install a small script on the Pi, and that’s it 😉 You can now power ON/OFF your Pi safely !


Concerning the STM32, I can directly use the 5v pin, so i don’t need do modify the board. The STM32 can be shut-down directly without special precaution, so no problem as for the Pi.


Animabot Rev2 – Servomotors

Posted by Emmanuel Sichet on 28/03/2014
Posted in: Animabot Rev2. Tagged: Animabot, Dongdu Robot, drs-0101, herkulex, servomotors. Leave a comment

Last week I received the new servomotors, I opted for numerical servos because they are much more powerful than the Hitec HS311 and they have much more options.

So I chose HerkuleX servos from Dongdu Robot, they are very similar to the Dynamixel but half the price for the same quality !

There are available on dfrobot.

I have not tested them yet because I am waiting for a Uart converter (3,3v to TTL). The STM32F4 is running on 3,3v but the motors need a TTL logic… Anyway, now I have them, so I will be able to begin the design in Solidwork \o/

HerkuleX DRS-0101
HerkuleX DRS-0101
HerkuleX DRS-0101
HerkuleX DRS-0101
Mechanical specification
  • Carbon Brush Cored DC Motor
  • A lot of adapting pieces
  • Rotation angle range: 320° Continuous Rotation
  • Resolution: 0.325°
  • Stall torque: 12kg.cm (7.4v)
  • Maximum Speed: 0.166s/60° (7.4v)
  • Gear: 1:266, Super Engineering Plastic
  • Size: 45mm(W) x 24.0mm(D) x 31mm(H)
  • Weight: 45g
Electrical specification 
  • Working Voltage: 7~12VDC(Optimized 7.4V)
  • Rated Current: 450mA @ 7.4V : 1.7kgf.cm
  • Communication Link: Full Duplex Asynchronous Serial(TTL Level), Binary Packet, Multi Drop
  • Multi control through Servo ID: 0 ~ 253, 254(Broadcast only)
  • Maximum Baud Rate: 0.67Mbps
  • Feedback: Position, Speed, Temperature, Load, Voltage etc.
  • Various Control Algorithm: PID, Feedforward, Trapezoidal Velocity Profile, Velocity Override, Torque Saturator & Offset, Overload Protection, Neutral Calibration, Dead Zone


One great advantage is that the motors can be connected to the bus, which save a lot of connectors and space for cables.

HerkuleX DRS-0101

HerkuleX DRS-0101 BUS

Animabot Rev2 – Design

Posted by Emmanuel Sichet on 28/03/2014
Posted in: Animabot Rev2. Tagged: Animabot, hexapod, robot, robotic. 1 Comment

For the second version of Animabot I want something different. I don’t want to see the motors or the electronic. I also want him more powerful, more intelligent and more friendly !

So for the design I opted for a full 3D printed body, which allow me smooth forms, and complex shapes. For the design I will inspire me from  Norio Fujikawa which has made this one :

Kanibot

The design will be complex to do, but I think I am able to do it 😉

For the intelligence I will use 2 boards :

  • Raspberry Pi model B
  • The Broadcom BCM2835 ARM11 700Mhz “System On Chip” Processor
  • Integrated Videocore 4 GPU capable of playing Full 1080p
  • 512MB RAM
  • Debian GNU/Linux Operating System
  • 2 x USB Ports
  • HDMI Video Output
  • RCA Video Output
  • 3.5mm Audio Output Jack
  • 10/100Mb Ethernet Port
  • 5V Micro USB Power Input Jack
  • SD, MMC, SDIO Flash Memory Card Slot
  • 26-pin 2.54mm Header Expansion Slot


  • STM32F4 Discovery board
  • STM32F407VGT6 µC featuring 32-bit ARM Cortex-M4F core, 1 MB Flash, 192 KB RAM
  • On-board ST-LINK/V2 with selection mode switch to use the kit as a standalone ST-LINK/V2
  • Board power supply: through USB bus or from an external 5 V supply voltage
  • External application power supply: 3 V and 5 V
  • LIS302DL or LIS3DSH ST MEMS 3-axis accelerometer
  • MP45DT02, ST MEMS audio sensor, omni-directional digital microphone
  • CS43L22, audio DAC with integrated class D speaker driver
  • Eight LEDs:
  • LD1 (red/green) for USB communication
  • LD2 (red) for 3.3 V power on
  • Four user LEDs
  • 2 USB OTG LEDs LD7 (green) VBus and (red) over-current
  • Two push buttons (user and reset)
  • USB OTG FS with micro-AB connector
  • Extension header for all LQFP100 I/Os for quick connection


Why these 2 ones ? because the Raspberry is powerful, runs on Linux, is cheap and has an huge community. The second one because it has a lot of pins (breakout board) which allows me to connect sensors and also drives all the servomotors.


This time I made a proper architecture :

Architecture

Architecture


Animabot Rev1 – Mechanic

Posted by Emmanuel Sichet on 28/03/2014
Posted in: Animabot Rev1. Tagged: Animabot, hexapod, hexapod robot, mechanic, robot, robotic. Leave a comment

The body of Animabot is composed of aluminium. I made the chassis by myself in my garage :

Hexapod Rev1
Hexapod Rev1
Hexapod Rev1
Hexapod Rev1
Hexapod Rev1
Hexapod Rev1
Leg assembled
Leg assembled
Leg assembled
Leg assembled
Leg assembled
Leg assembled
Chassis
Chassis
Chassis
Chassis
Legs parts
Legs parts
Body fully assembled

Animabot Rev1

Posted by Emmanuel Sichet on 28/03/2014
Posted in: Animabot Rev1. Tagged: Animabot, hexapod, hexapod robot, robot, robotic. Leave a comment

I started the construction of a hexapod robot named Animabot in 2007.  This was a child dream since the serie “F/X: The Series” in which one there is small hexapod named Blue. This robot was considered as a dog, and since I also want my own “dog robot”.

The goal of this project is to have an animated and responsive robot, a robot which can interact with its environment and the people,  in the same way as Aibo.

Animabot was first made out of Plexiglas and controlled by a BasicStamp 2e. Then I changed the Plexiglas for aluminium and the BasciStamp for a PIC µC. Trough the years, I have made 7 evolution of the board with a PIC 16 then 18 and finally a 32.

Animabot is autonomous thanks to a rear sensor and a front sensor mounted on a moving head. He can move in an indoor or outdoor environment avoiding obstacles. He is also able to stabilize itself thanks to an accelerometer.

Animabot can be manually controlled by an Android application or a computer software, both done by a Bluetooth communication.

Hexapod Rev1


Remote control by laptop :


Stabilization :


Obstacles avoidance :

Animabot Rev1 – Electronic

Posted by Emmanuel Sichet on 27/03/2014
Posted in: Animabot Rev1. Tagged: Animabot, electronic, hexapod, motherboard, power supply. Leave a comment

The electronic is based on a  PIC32 from Microchip.

I made all the schematic and the layout on Altium and then, I made the board on BatchPCB which has changed to OSH Park. The quality is very good and the price quite low (around 50$ for this board)

The mother board is composed of :

  • PIC32MX795F512L
  • RTC
  • Audio module SOMO14D 
  • Accelerometer LIS2L02AS4
  • Bluetooth module Free2move
  • An eeprom


Board preview in Altium
MotherBoard
MotherBoard


There is also a power board composed of 3 step-down integrated switching regulators (ISR) 1 PTR08100W for the legs power and 2 PTN78060W, 1 for the head, and one the 5v supply of the motherboard

Power Board
Power Board
Power Board
Power Board
Power Board
Power Board


And how it looks like both boards connected :

MotherBoard and Power Board integrated

Animabot is equipped with 2 infrared sensors GP2D12 (front and rear), and 18 servomotors Hitec HS311 connected to the motherboard.

Solidworks Design

Posted by Emmanuel Sichet on 27/03/2014
Posted in: SolidWorks. Tagged: Solidworks. Leave a comment

I am working with Solidworks for several years now, these are some of design I made.

The buggy was made for fun, but the hand was designed during my internship at the University Of Plymouth for a biped robot (Bioloid)


Solidworks design
Solidworks design
Solidworks design
Solidworks design
Solidworks design
Solidworks design
34146_1453481610341_3518967_n

Posts navigation

← Older Entries
Newer Entries →
  • Enter your email address to follow this blog and receive notifications of new posts by email ;)

  • License

    Creative Commons License
    Hexapod Robot Animabot created by Emmanuel Sichet is licensed under a Creative Commons Attribution-NonCommercial-NoDerivatives 4.0 International License.

    Creative Commons License
    Animabot & Anim4Bot names created by Emmanuel Sichet are licensed under a Creative Commons Attribution-NonCommercial-NoDerivatives 4.0 International License.

  • Search

  • Linkedin profile

    View Emmanuel Sichet's profile on LinkedIn
  • Archives

    • October 2020 (1)
    • April 2020 (1)
    • March 2020 (1)
    • December 2019 (2)
    • November 2019 (2)
    • September 2019 (1)
    • August 2019 (2)
    • July 2019 (3)
    • June 2019 (1)
    • May 2019 (1)
    • April 2019 (2)
    • February 2019 (1)
    • January 2019 (1)
    • February 2017 (1)
    • September 2016 (1)
    • November 2015 (1)
    • September 2015 (1)
    • August 2015 (1)
    • July 2015 (2)
    • June 2015 (3)
    • May 2015 (2)
    • April 2015 (1)
    • March 2015 (3)
    • February 2015 (1)
    • November 2014 (2)
    • October 2014 (2)
    • August 2014 (1)
    • July 2014 (3)
    • June 2014 (2)
    • May 2014 (4)
    • April 2014 (2)
    • March 2014 (14)
  • Meta

    • Create account
    • Log in
    • Entries feed
    • Comments feed
    • WordPress.com
  • Blog Stats

    • 45,008 hits
Blog at WordPress.com.
Anim4Bot
Blog at WordPress.com.
  • Subscribe Subscribed
    • Anim4Bot
    • Already have a WordPress.com account? Log in now.
    • Anim4Bot
    • Subscribe Subscribed
    • Sign up
    • Log in
    • Report this content
    • View site in Reader
    • Manage subscriptions
    • Collapse this bar
 

Loading Comments...